The Matrix Editor
The matrix editor works in a way similar
to a very simple spreadsheet. It contains a grid of editable cells, where the
top row and the first column show the cell coordinates.
The toolbar on
the top allows you to paste values in the matrix and set custom headers. In detail you can:
- Paste some values in the matrix (for example from a
spreadsheet), starting from the top-left cell (0,0).
- Set special values in the column header or in the row
header . When you open the editor the column and row headers display
the rows or columns indices (0,1,2...), but if you like you can
substitute them with the content of a vector. This is useful when you
want to align the content of the new matrix to the content of another
matrix/vector. For example, you can write a time series using as row
header the vector defining the period in which the time series is
defined, day by day.
You have two options:
- Set the row header (vertical) (content)
- Set the column header (horizontal) (content)
In both cases you need to select the matrix you need to use as header
in the matrix selection dialog.
If you use the selected matrix as row header, only the first column of
the matrix is displayed. If you use it as column header, only the first
row is displayed.
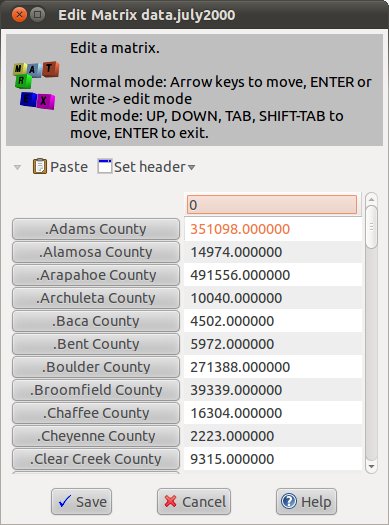
In the following example we are entering values in a vector with the help
of a row header:

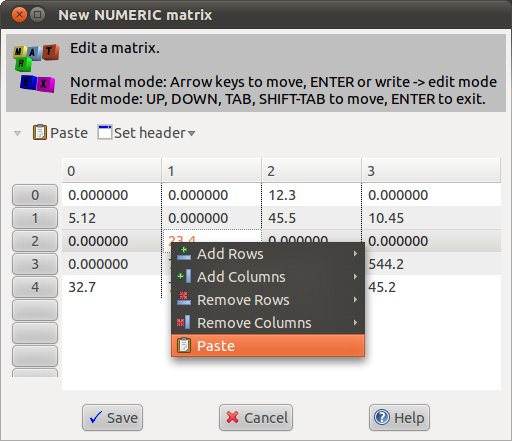
With the popup menu
that appears clicking with the right button on the grid you can change
the size of your matrix and paste values in it. In detail you can:
- Add Rows:
- Add 1 row before the currently selected cell
- Add N rows before the currently selected cell, if 1 is not enough.
In this case a dialog box appears requesting the number of rows to
add.
- Add 1 row after the currently selected cell
- Add N rows after the currently selected cell, with a dialog box
requesting the number of rows to add
- Add Columns:
- Add 1 column before the currently selected cell
- Add N columns before the currently selected cell, with a dialog box
requesting the number of columns to add
- Add 1 column after the currently selected cell
- Add N columns after the currently selected cell, with a dialog box
requesting the number of columns to add
- Remove Rows:
- Remove the row containing the currently selected cell
- Remove N rows, starting from the one containing the currently
selected cell
- Remove Columns:
- Remove the column containing the currently selected cell
- Remove N columns, starting from the one containing the currently
selected cell
- Paste some values in the matrix (for example from a
spreadsheet). The values are pasted starting from the selected cell of
the matrix. It can be used to paste a part of a spreadsheet in a matrix.
Using the add row and add columns buttons
in the toolbar in the matrix editor, for example, starting with a 3x3
matrix you can add 7 columns and 7 rows to have a matrix 10x10. Once the
size of your matrix is the one you want, you can start to write its values.
Editing a matrix
As when editing a table in other applications, the matrix editor in Matrex
can be in one of the following two modes:
- normal mode: you move the cursor in the matrix using the arrow
keys (or the mouse), you are not changing the value of any cell.
- edit mode: you are changing the value of a cell.
When the matrix editor starts, it is in normal mode. To enter in the edit
mode, move the cursor to a cell and either:
- press ENTER. If the cell contains already a value, it is selected, so
that you can change it.
- write the first character of the value of the cell. If the character
is valid, it is written in the cell substituting the previously
contained value.
In edit mode, you can move from one cell to the other using the up/down
arrow keys (up/down) or the TAB/SHIFT TAB keys (right/left). Editing the
value of a cell and moving to another one changes the value of the cell
with what you have written, To exit from the edit mode and go back to the
normal mode press ENTER. To close the matrix editor, you can:
- click on the Cancel button on the bottom of the editor. In
this way you close the editor without saving the content of the matrix
(you need to confirm this choice).
- click on the Save button on the bottom of the editor. In this
way you save the content of the matrix and close the editor. After you
click on the button you need to write the name and the package
of the new matrix in the name-package dialog.
Once the matrix is saved, it appears on the matrices tree
view in the project toolbox. The matrices tree is very similar to a file
browser (explorer, nautilus), where the matrix is equivalent to a file: the
file name is the matrix name, the file path in the tree is given by the
package.

The same concept of package, name and tree is applied to the other items
(functions, presentations, templates, charts and timers),
Behaviours of the different matrix editors
The editors for the various matrices types work in the following way:
- The numeric matrix editor allows to write numbers in the
cells, using always the decimal separator defined in the GUI settings.
- The text matrix editor allows to write any text in the cells.
- The date matrix editor allows to write dates in the cells
using the format defined in the GUI
settings. The content of a cell can be a date/time or just a date.
In each case the editor uses the related GUI settings format to parse
the cell content.
- The boolean matrix editor allows to write true values using
the format defined in the GUI
settings. If the GUI settings have not been changed the T letter
(T) is used for true and the dot character (.) is used for
false. Even if I did not see this pattern in any other
application, I found it good because it is impossible to confuse true
and false and therefore the matrix results clear and easy to
understand.


