The Presentation Editor
The presentation editor is based on
the following criteria:
Since the matrices can change size when the functions that produce them are
recalculated, it does not make sense to add them to the presentation's grid
with absolute positions, because in this way they overlap and confuse
the presentation.
A good idea is instead to set the position of a matrix (say B)
relatively to the one of another matrix (say A) in the presentation.
In this way if the matrix A changes size or position the matrix B is moved
automatically in the presentation's grid to avoid to overlap matrix A.
To do this, the presentation is organized as a tree. One matrix is set
in the presentation's grid with absolute position from the grid's origin.
This matrix is called root (in practice more than one root is allowed, but it
is generally not a good idea because it complicates and confuses the model).
Other matrices are added to the presentation's grid under or on the right
side of the root matrix, at a certain distance. In terms of the tree, these
matrices are children of the root matrix. They can theyself have children and
so their children and descendants.
Structure
To let this model be explicit, the presentation editor shows:
- the presentation's grid with all the presentation's matrices in
the correct positions on the left side of the editor.
- the tree of the matrices on the right side of the editor.
- the properties of the presented item that is currently selected
in the tree: colors, position, format. As we will see later, these
properties are changed with the presented
editor.
The grid is there to show how the presentation will look like, but the
tree is the real editor, where the matrices are added, removed and the
other interactions are done. Matrices are actually not the only kind of
objects that you can add to a presentation: it is also possible to add texts.
A text is used as a title or a note in the spreadsheet, and
differently from the matrices it covers one single cell of the presentation's
grid.
Editing
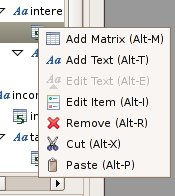
To add a matrix to the presentation, click with the right button of the mouse
in the tree. A pop up menu appears.�
Select Add Matrix. The matrix
selection dialog comes up. Select the matrix you want to add and press
OK. Now you need to set the position and format of the new matrix, through
the presented editor. When you press OK
the matrix is added to the tree as child of the selected item or as root if
no item is selected. It also appears on the presentation grid.
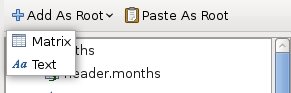
If you want to be sure to add the matrix as root of the tree, you can click
on the dropdown button Add as Root
on the toolbar over the tree. In the menu that appears select
Matrix.
Alternatively you can drag&drop the matrix in the presentation
tree from the matrices tree view. You can also add a text to the
presentation, selecting Add Text in the tree pop up menu (or Add as
Root on top of the tree and then Text if you want the text as root of the
tree). In thepresented textdialog write the text to add to the
matrix.
It will appear in a cell of the presentation's grid and in the tree as new
item. Here too, if you opened the menu on a tree item, the text would be a
child of it; otherwise it would be a root in the tree. Other operations are
possible through the pop up menu described before; you can:
- Edit a text using thepresented textdialog.
- Edit an item's position and format with the presented editor.
- Remove an item from the tree (matrix or text). Doing this, if
the item has descendants in the tree they are also removed. The system
needs you to confirm the removal through a confirm dialog.
- Move an item with its descendants in the tree, cutting
the item and its descendants from the tree and pasting them in
another location on the tree (to a different parent). If the item needs
to be pasted as root use the Paste as Root button over the tree.
Items cannot be moved from a presentation to another.
Also on the top of the presentation's grid there is a toolbar, which contains the buttons Fit Columns, Refresh, Copy
Selection, Export, Edit <matrix> and Print as seen in
the presentation viewer.
In this context the Refresh button, which allow you to refresh the
content of the grid, can be very useful in cases of collisions between
matrices or texts. In fact it can happen that adding, moving, cutting and
pasting items in the presentation some items overlap. We call this kind of
event collision.
When two items collide the message view in the main Matrex window shows a
message (something like “The presented object A and B collide. Please
change their relative position and select the refresh menu.”) . It can
be only a temporary problem that disappears when you terminate your editing.
If instead the problem persist you need to understand which items collide
from the message in the message view, then you can for example:
- fix your tree so that there is no item that has more than one child on
the same side (both on the right or on the bottom). To do that you can
cut and paste items in the tree.
- change the x and y distances of some items from the parents.
After this operations remember to use the Refresh button in the grid's toolbar to check if there are more
collisions.
To close the editor, you can:
- click on the Cancel
button on the bottom of the editor. In this way you close the editor
without saving the content of the presentation (you need to confirm this
choice).
- click on the Save button on
the bottom of the editor. In this way you save the content of the
presentation and close the editor. To do that, you need to write the name
and the package of the new presentation in the name-package dialog, in
the same way as with the matrices.